3g Supported Mobile

  • Subscribe to our RSS feed.
  • Twitter
  • StumbleUpon
  • Reddit
  • Facebook
  • Digg

Tuesday, 30 August 2011

Why Does My Nintendo Wii Disc Drive Light Flash Blue?

Posted on 09:04 by Unknown

If the light around the disc drive slot is flashing blue continuously, the reason why it is flashing blue is because the console is connected to the internet. When the Nintendo wii is connected to the internet, it communicates frequently with Nintendo. There are many reasons why the blue light can be flashing, so i have listed the common ones below: 

1)Your console is updating its software version, using the internet connection.

2)You have received a message from a friend.

3)Your console is connected to Wiiconnect24, this allows the wii to communicate with the internet automatically and is a feature that allows your wii to receive data 24 hours a day. This can make the console receive data such as receiving special messages from Nintendo about products or offers, news and weather updates.
Read More
Posted in | No comments

How To Connect a Bluray Remote To a PS3 Console

Posted on 08:34 by Unknown

If you use the ps3 as you daily bluray player to watch bluray movies, then to make life easier, you would probably purchase a remote control. This is to make it easier to forward, rewind, pause, play and overall make it easier to navigate through the movie, as well as accessing features. If you have a bluray remote control for your ps3 console, i have provided instructions so you can connect it to your ps3 console:

1)Insert good quality batteries into the bluray remote control.

2)Then power on the ps3 console and wait for the XMB menu to come up on the television screen.

3)Go to option called 'Accessories settings' and then select the option called 'BD Remote control'.

4)Hold the select and enter button on the bluray remote control for 13 seconds and it will be hooked up to the ps3 console.
Read More
Posted in | No comments

How To Fix Music Buttons That Are Not Wokring On a Nokia 5310

Posted on 05:35 by Unknown
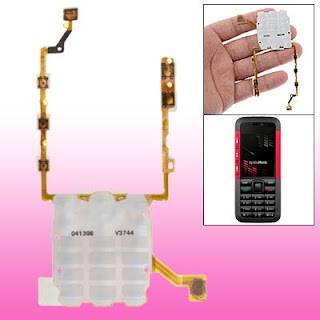
If you have a Nokia 5310 and three buttons on the left side of the screen lens are not working or are not responding the first time they are pressed, the button ribbon is likely to be damaged. The button ribbon is a cable that has two pieces of metal inside it, when you press the play button for example, the play button will push down the two metals and the button will function. If one of the metals is worn out, the circuit is broken.

So first you will need to buy a replacement keypad ribbon keypad, a image of it is below, so you know what it actually looks like:

Once you have that replacement part, next you will need to disemble the Nokia 5310 and use the video for your guidance, as instructions on how to remove and replace the keypad ribbon cable. You will require a torx 6 screwdriver; this is so you can unscrew the screws holding the housing.

Read More
Posted in | No comments

Can You Charge a TomTom Through USB On a Computer?

Posted on 05:22 by Unknown
The battery inside the TomTom will eventually become dead, making the sat nav unusable. To charge the battery many people tend to use either a home or car charger. But the question today is can you charge a TomTom through usb on a computer?


Well the answer is yes because the TomTom requires 5 volts to charge up the battery pack inside it. 5 volts can be provided by a home or car charger and also a usb socket can also provide it. But in order to charge an TomTom through a usb on a computer, you will require a cradle or a mini usb cable, the same cable that is used to connect a psp to a computer. Once you have either of them, click on the blog post below because it provides step by step instructions:

How To Charge a TomTom With a Computer
Read More
Posted in | No comments

How To Charge a TomTom On The Computer, Using a Dock With a USB Cable

Posted on 05:18 by Unknown

If you don't have a home or car charger, but if you have the TomTom sat nav dock/cradle, you can connect your sat nav onto it and charge it using your computer. If you don't have a TomTom dock, then i suggest you buy a cheap mini usb cable because it is much cheaper than buying the dock. Once you have the dock, or mini usb cable, follow the instructions given below, they can be used for both computers and laptops:

1)Connect your TomTom to the dock, this is by inserting it onto the mini usb connector on the dock. If your using a mini usb cable, plug the cable into the mini usb socket found on the bottom of the TomTom.

2)Then connect the usb connector in a spare usb socket on your computer, that can be found on the front and rear of your compute or laptop.

3)Make sure you're TomTom is turned off, this is so it doesn't drain battery charge, during charging.

4)Power on your computer, a green light will be lighted up and the TomTom will be charging up from the  5 volts that is provided by the usb.
Read More
Posted in | No comments

Monday, 29 August 2011

How To Fix Your PlayStation 3 Thats Making a Humming Noise On Your TV

Posted on 13:02 by Unknown

If you have connected your ps3 to your television and the sound from the speakers inside the TV are making a loud and annoying humming sound, then there is likely something wrong with the cable you are using to connect the ps3 to your TV.

Troubleshooting this problem:

1)Make sure that the the Av cable is connected firmly into the socket on the ps3 console and composite or scart sockets, depending on which connection type you are using. Loose connections are known no cause problems with the picture and sound. If you spot a loose connection, push in the plug into the socket.

2)Get a tissue and clean the connectors on both ends of the cable, cleaning the connectors that goes into the rear of the TV and the ps3. Static electricity can build up on connectors that have been exposed to electrical items that cause interference and dust, wiping them should get rid of it.

3)Check the cable for any damage, things to look out for are things such as split wires or loose ends. If you do spot them, replace the cable because that can cause interference with the audio.

4)If the cable is has silver plated connectors, that can enhance sound interference. So replace it with a gold plated cable because it provides a reduction of humming, from electrical items around your ps3 that cause interference with the TV's sound and it also provides better picture quality. The reason why is because gold is a better electrical conductor, if compared to silver and picks up less static.
Read More
Posted in | No comments

How To Fix a TomTom Sat Nav That Won't Turn On, But Green Lights Comes On When Charging?

Posted on 06:19 by Unknown

There are many different models of the TomTom sat navs that display a green light when charging and when your press the on button, it won't turn on, but charges fine. This problem is very common to occur on 'Go' models and replacing the battery pack will usually not resolve this problem. When this happens, the TomTom will charge, but will not power on, making it useless. I have a few TomToms, some are new and old models and they have suffered from the green light of death after a few years of good use out of them. I was trying to fix this problem without opening the sat nav and spotted a reset button, near the mini usb socket.

This reset button resets the software on the TomTom and also can be used as a quick repair solution for your TomTom sat nav, if it doesn't turn on, but charges fine. The reset procedure is very simple, all you need is a small pin or a pointy screwdriver, as a object to push the little reset button inwards. Then insert the object into the reset hole, on most TomTom sat navs it is located at the bottom, near the usb socket. Push in the object; this will push in the reset button.

Once you have pushed it in, hold it there for 10 seconds and then remove the object from the hole. The sat nav will be reset, now all you need to do is power it on, problem should be fixed! If still no luck i suggest you charge the battery pack again. If you have done the reset and still no luck getting it to turn on, then it is probably a electronic component on the circuit board that has shorted circuited. If that is the case, it is not really worth your repairing it, so buy a new sat nav!
Read More
Posted in | No comments

Sunday, 28 August 2011

Is Your Nokia N95 Screen Damaged Because Of Water Damage?

Posted on 09:56 by Unknown

If your Nokia n95 has recently been water damaged because the mobile phone actually fell into water by accident, you will have to accept that. You have probably wiped the water from the mobile phone casing, battery and placed the mobile phone in a box of rice, as a quick repair solution. This solution does make most peoples water damaged Nokia n95's turn on, however there is large gaps on each side of the phone, near the slide, which water can easily get into. That water is likely to be inside the screen, if the screen is displaying fuzzy colours, or showing a blank screen, then the screen has water inside it.

Instructions:

1)Get yourself a torx 5 screwdriver and unscrew the 4 screws that are holding the front cover onto the mobile phone.

2)Then place all 4 screws in a safe place and then remove the front cover and also place that in a safe place.

3)Next get a hairdryer, turn it on, set it to a warm temperature and point it towards the screen for 2 minutes.

4)Power on the Nokia n95, the screen should now be fixed, if not keep hair drying the screen until it corrects itself.

5)Once you have got the screen back to normal, replace the front cover, along with the 4 screws, using your screwdriver.
Read More
Posted in | No comments

Sunday, 21 August 2011

How To Fix a Disc Stuck Inside Nintendo Wii Drive Inside The Console

Posted on 05:54 by Unknown

If you have inserted a disc into the disc drive inside the Nintendo wii console and it doesn't come out when you eject the disc, then it is stuck. This can happen because the Nintendo wii has been unplugged and turned off, when the disc is half way in the disc slot. If this is the situation, then i have two excellent methods that are listed below that should remove the disc:

Method 1:

Well you can try to remove the disc yourself, without having to send the console to Nintendo. All you need to do is power on your Nintendo wii console. Then turn the console upside down, the disc slot facing the direction of the floor. Then press the eject button rapidly and the disc hopefully should become unstuck from the disc drive and eject itself.

Method 2:

Unplug the Nintendo wii from the electrical outlet, and then plug it back into the electrical outlet. Then power on the Nintendo wii, this is by pressing the power button. Now hold down the eject button for 12 seconds, the disc should remove itself from the disc drive. If not, then hold down the power button for 12 seconds and the eject button again.

If none of them methods work to remove a stuck disc inside your Ninendo wii's disc drive, then the best thing is to call Nintendo customer service. But if your console is still under warranty, then you can exchange it with a brand new replacement wii.

Nintendo customer service telephone contact number: +44 (0)845 60 50 247
Read More
Posted in | No comments

How To Connect Any Mobile Phone Bluetooth Headset To a PS3

Posted on 05:37 by Unknown
If you have a ps3 console and it is connected to the PSN network and you have loads of friends, you probably want to chat with them, using voice chat. To chat with them, you can use the chatpad, although it is not the same as talking, so if you have a mobile phone bluetooth headset, you're in luck! The ps3 connects a bluetooth headset to itself using bluetooth, as the wireless technology. So this means that you can also connect any cell phone bluetooth headset to your ps3.

Instructions:

1)Power on your ps3 console and let it boot onto the XBM menu, then go to 'Settings' then 'Asessories settings and finally select 'Register bluetooth device'.

2)Next the option that you need to select is called 'Register bluetooth headset/microphone/headphones'.

3)Then enable your  bluetooth headset into paring mode, this is so the ps3 can pair with it, this is so the ps3 console can find it.
4)Select the 'Start scanning' option on your ps3 console. This will enable the ps3 to scan for your bluetooth headset.

5)Once your ps3 has found your cell phone bluetooth headset, enter '0000' as your paring code.

6)You will then need to go into 'Audio device settings' and change the input and output device, to the name of your bluetooth headset you just paired with your ps3 console.

7)Your ps3 should be paired with your cell phone bluetooth headset and will be fully functional.
Read More
Posted in | No comments

Saturday, 20 August 2011

How To Charge Your PS3 Conroller On a Xbox 360 Console

Posted on 08:11 by Unknown

The ps3 battery inside the controller gets charged from the power that is provided by the usb port on the ps3. The Xbox 360 also has a usb port and it can also be used to charge up a ps3 controller, as it can provide charge to the controller the same way the usb port on a ps3 console. Charging a ps3 controller on a Xbox 360 console might be handy, if you're playing on your Xbox 360 console and not playing on your ps3, as the ps3 controller will be charging while you're using your Xbox 360 console. Making the controller charged up and ready for you the next time your play on your Playstation 3 console.

How To connect a Xbox 360 controller to a ps3 console, to charge it up:

1)Plug in the mini usb cable into the mini usb socket, found on the top side of the controller.

2)On the other side of the cable, plug in the usb connecter into a spare usb port on your Xbox 360 console.

3)Power on your Xbox 360 console and the four lights on the top of the controller that represent how many controllers, will be flashing red continuously, this happens because it can't find your ps3 console, but the controller is still get charged up.

4)When the ps3 controller is fully charged, the four lights will turn off. Then you can go ahead and unplug the usb connecter from the usb port and turn off your Xbox 360, if you not using it.
Read More
Posted in | No comments

How To Fix TomTom 720 Battery Not Holding Charge Problem

Posted on 07:44 by Unknown


If you have a TomTom 720 car sat nav for more than 2 years and the battery life is very poor and doesn't last more than 5 minutes on a full charge, then the battery inside it is faulty. So you will need to order a genuine replacement battery and remove the old battery and replace it with the new one you have ordered. The battery not holding charge problem is very common on all TomTom car sat navs, especially the 720 model, so you' re not the only one facing poor batter life problems. I have a TomTom 720 car sat nav myself and also faced this issue and replaced the battery pack and battery life was excellent once again! So i am 100% certain that replacing the battery pack will solve the problem:)

Once you have ordered a replacement battery, click the link below because it will redirect your do a blog post that provides instructions in a video tutorial, if you are going to replace the battery yourself, you might find it useful.

How To Change Battery Inside a TomTom 720
Read More
Posted in | No comments

How To Connect a Second Wireless Controller To a Xbox 360 Console

Posted on 07:25 by Unknown

If you have your friends or family that want to play Xbox games with you, using the multi-player option in a game you want to play together, you will need a second controller hooked up your Xbox 360 console. There are two types controller you can buy, a wired controller and a wireless. Both to the same job, but the wireless one has no wires, although it takes 2 AA batteries on the down side and they will constantly need replacing. Once you have a second controller, if it is a wireless one, use the instructions provided below to get it connected to your Xbox 360 console:

1)Insert 2 AA batteries into the controller, this is by removing the rear battery holder and inserting the batteries into it and then replace the battery holder  back onto the controller.

2)On your Xbox 360 console there will be a small circular button, placed near the second memory card flap. There is also a button on top of the controller, what you need to do is press them both at the same time.

3)Once you have done that, the second controller will be connected to your Xbox 360 console. If you want to add more controllers, apply the same method.

If it is a wired controller, then all you need to do is the plug it into any free usb port on your Xbox 360 console.
Read More
Posted in | No comments

Friday, 19 August 2011

Does Joikuspot Connect a PS3 To The Internet and PSN?

Posted on 16:09 by Unknown
Well there are many people that have a Nokia mobile phone and have a fast 3G internet connection from their mobile phone network provider. Thanks to a great application called 'Joikuspot' you can turn your Nokia mobile phone into a wireless hotspot, using your phones internet connection. You have probably tried it on your laptop and you find it works perfect, just like a actually wireless router because the laptop can connect to the internet in infrastructure and adhoc modes. But when i tried connecting it to my ps3, it could not find the wireless hotspot Joikuspot created. The reason why is because the ps3 can only connect to the internet in infrastructure mode and not adhoc, this is the same situation with the psp console and Nintendo ds. So the answer is no, you can't actually connect your ps3 console to the internet using a Nokia phone and Joikuspot. But things can change, and maybe in the near future Joikuspot can some how support infrastructure mode.
Read More
Posted in | No comments

What is a CB Radio Power Microphone Exactly?

Posted on 15:55 by Unknown

A power microphone is used to amplify your voice that you speak into the mic. Then that voice then gets amplified by the amplifier power circuit inside the microphone, overall making your voice sound louder and clear and can trick people into thinking you have a $400 dollar CB radio. Then your voice is sent into the CB radio to transmit it on the air waves, louder with more clarity, if compared to a standard cb radio mic. A power mic is relevant if you have increase the modulation inside your CB radio and there is no significant gain in gaining more modulation. Inside a power mic, a 9 volt battery is required for the amplifier circuit. So power microphones have a built in echo feature, which is adjustable, so you can sound unique on the air waves.
Read More
Posted in | No comments

How To Hard Reset a Samsung E740 To Factory Settings

Posted on 10:00 by Unknown

If you are giving or selling your Samsung e740, you will probably want to delete data such as your messages and contacts, this can be very time consuming if you have tones of contacts and messages stored on the phone's memory. To save you time and hassle, you can enter a hard reset code into the phone's number keypad, this will wipe everything off the phone in one go and the phone settings will be set to factory settings!

Instructions:

1)Power on your Samsung e740, with a sim card and wait for it to turn on and boot to the home screen.

2)Once the phone is on the home screen, enter the following code into the phone using the number keypad: *2767*3855#.

3)If you have entered the reset code correctly, the phone will be hard reset successfully.

Read More
Posted in | No comments

How To Tell If a BenQ or Lite On Drive Is Inside Your Xbox 360 console

Posted on 09:48 by Unknown
If you are thinking about flashing the disc drive inside your Xbox 360 to play back up games, then you will need to make 100% sure which drive type is inside your console. This is so you buy the correct tools and equipment to flash the drive. There are different types of drives because some of them are more easier to flash Ixtreme firmware onto them. If you do have a lite on drive inside your Xbox 360 console, it is better than a BenQ drive because it is much more quite, when loading games.

To identify whether you have a lite on or BenQ drive you have inside your Xbox 360 console, without removing the top cover and not voiding your 1 year warranty, then all you have to do is remove the faceplate. This is easy all you have to do is get a good grip of it and pull it off, but carefully!

Once you have removed the faceplate, you will see a small hole with 2 small wires, below the disc tray bezel. If the two wires are colored white, then that means the drive is a Lite On type. If wires are white colored, you have the BenQ drive.

Read More
Posted in | No comments

How To Remove a Disc Thats Stuck Inside The PS3 Slim Drive

Posted on 09:20 by Unknown
If a game, audio or blueray disc is stuck inside the drive and the disc will not eject out, when you press the eject button on the ps3 console, the disc is stuck. This can be a problem because you can't remove the disc from the ps3 slim disc drive, this means you can play other games, listen to different audio CD's or watch a different blueray movies. When Sony created the ps3 slim, they created a alternative method to allow you to manually remove the disc that is stuck in the drive, without having to dissemble the ps3.

To remove a stuck disc that is inside your ps3 slim's drive, all you need is a small Pphilips head screwdriver and your ps3 slim console.

Instructions:

1)Turn off the ps3, this is by holding down the power button on the ps3 slim console, once the led has become red, unplug it from the electrical outlet.

2)Next, turn your ps3 over and you will see a odd rectangular plastic cover, using your finger nail, open it.

3)You will see two screws, a large blue colour screw and a smaller screw. The screw that you want to unscrew is the small one, not the large blue colour one. Then get your screwdriver and then turn the screw counterclockwise, this will eject the stick disc from the drive.

4)Once the disc has been manually ejected, replace the plastic cover.
Read More
Posted in | No comments

Thursday, 18 August 2011

How To Connect a Freeview Set Top Box To a TV

Posted on 03:08 by Unknown
The digital switch over has been taken place in the United Kingdom, this means that you will no longer receive the basic 5 channels that you were getting. This is because all the transmitters of them 5 channels have been permanently shut down because of Freeview and Freesat. Freeview offers a more variety of channels, such as Flim 4, additional news channels, cartoon channels for the kids and digital radio stations, without you having to pay a channel subscription, like you do with Sky. For a full list of all the channels, it would be best for you do visit the official Freeview website because they are always adding more. Also you will gain better picture quality with a Freview set top box because the video signal is provided to the TV using scart, this also means better sound quality. Plus if you have a HD television, you can also buy a HD Freeview box, and get a HD signal to your TV and watch channels in high definition.

Most Freeview set top boxes can be bought for £20.00 or less if it has already been used, they should include a remote control, a power adapter, an instruction booklet and a scart cable. You also need a TV with a scart socket, or a HD socket if you have got a HD TV and a HD Freeview box. Once you all that, you are ready to install the box for your TV, using the instructions provided below:

1)Connect the  power adapter into your Freeview set top box, this is usually found on the back. Once you have done that, connect the other end of the power adapter into an electrical outlet socket.

2)Connect a scart cable into the a free scart socket on your TV, this is found on rear panel of the TV. Then connect the other end of the scart cable into the Freeview set top box, in the scart socket called 'TV'.

If you have a HD freeview set top box, then you will need to buy a HD cable, but only if it is not provided the box. Then connect the HD cable into a free HD socket, found near the scart socket on most tellys. Then connect the other end of the HD cable into HD socket found on the Freeview box.

3)Power on your TV and then power on the Freeview set top box. The TV should automatically configure the scart socket itself. If not, change the AV mode on the TV remote control, if you are using a scart cable.

4)That is it you have completed the wired part of the installation, now all you need to do is scan the Freeview box for new channels and you should be done! See your instruction booklet because it will show you how to tune the Freeview box.
Read More
Posted in | No comments

Wednesday, 17 August 2011

How To Spot a Fake Nokia 6288 Housing/Cover/Fascia

Posted on 07:40 by Unknown
If you are buying a replacement housing, know also as a cover or fascia for your mobile phone, you want to make 100% sure you buy a original. Genuine housing is always better, if compared to cheap copies because they last more longer and the colour does not fade off that quickly. You are probably aware that there is many fake Nokia 6288 covers on the internet that are for sale for a cheap price.   

To prevent you from buying a non genuine fascia for your Nokia 6288, i have come up with a simple guide you can use, when buying it.

1)What is the price of the cover?

Most replacement covers that include a battery cover, keypad buttons and cover and front cover that are original that are made from Nokia, are priced more than £6.00. If you see a website claiming that it is an original housing made from Nokia and the price is around about £2.50, clearly the housing is a fake.

2)How can i tell from the picture of the housing that is provided on the website is fake?

On the fake housing there will be no Nokia brand name on the screen lens on the front cover and on the battery cover, like in the image given below:


If the housing is a genuine replacement product from Nokia, it will have their branding name on the back battery cover, near the camera and also will have their brand name on the screen lens, near the ear speaker. Just like in the example image shown below:

Read More
Posted in | No comments

Do You Have To Tune a Sealed Subwoofer Enclosure?

Posted on 06:36 by Unknown

Everybody knows that you have to tune the port on a ported/vented enclosure to the Hz frequency you want your subwoofer to play. This is by increasing or decreasing the length of the port or the vent itself. If you are going to create or want to buy a premade sealed box, they are both not tuned to a bass frequency. A sealed box does not have a specific frequency tuning because it has no port or vent to have control of an exact bass frequency. So if you want make a sealed subwoofer enclosure play bass deeper and hit lows better, then that can be achieved by building a box with more cubic internal volume. To lower the tuning on a sealed premade subwoofer enclosure, then you would have to add polyfill inside the box. The more polyfill you add, the more low end bass response of the subwoofer is going to be heard. If you want to make a sealed subwoofer enclosure play bass louder, then that can only be achieved if you overpower the subwoofer, increasing the tuning frequency on the car amplifier, or you could simply place it in a ported/vented enclosure that is tuned to about 40-42Hz.
Read More
Posted in | No comments

Turn Your Nokia X6 Into a Decibel Meter To Measure DB

Posted on 05:55 by Unknown

If you have a Nokia x6 mobile phone and you want to measure how loud sound is and you don't have a proper decibel meter, then you can use your Nokia x6 and a application called ' Picobrothers Decibel Meter', to measure how loud sound actually is. This application uses the microphone inside the Nokia x6 and that picks up the sound and the displayed vu meter on the screen and it will show you how much db the sound is. I have downloaded it onto my own Nokia x6 and it is actually accurate in terms of measuring db.

Before you install Picobrothers Decibel Meter onto your Nokia x6, make sure you have installed Nokia QTv4.7.1, if you don't, the application will not run. Also it will require a internet connection, when it is running, so make sure you have a data plan that offers lots of internet usage.

Download Picobrothers Decibel meter 
Read More
Posted in | No comments

Tuesday, 16 August 2011

What IsThe Best Car Subwoofer That Hits Bass Hard Under £100??

Posted on 11:26 by Unknown

When it comes to car audio, price always equals sound quality and reliability. Good sounding car audio from big brands like Jl audio and Rockford Fosgate will be more expensive to buy than car audio products from Sony Xplod or Jbl. This is because the engineering and the quality of the product is much better. If you don't want to spend hundreds of pounds on a good sounding subwoofer, then i would consider you the 'Kicker C124 12 inch competition subwoofer'. That subwoofer produces loud bass that you can feel, thanks to the large 12 inch cone, i know this because i saw it in a car audio shop and i could actually feel the bass on my chest, no joke! It also has a ribbed foam surround, this basically means when you crank up the volume loud, the surround will not tear, which is a common with cheap Sony Xplod subs. This subwoofer can also take a whopping 150 watts rms from a car amplifier, which is plenty of power for the sub to pick up the low frequencies. 

The Kicker can also be placed in two recommend types of box enclosures, if you want tight, accurate and less boomy bass, then i recommend a sealed box. If you want it to pound the lows and perform loud, then definitely a ported enclosure tuned to 34Hz will be perfect. Overall, it is a good sub that sounds the best for £100, that is my option, Don't buy the Sony Xplod subwoofer because it says '1000 watts' on the dust cap, that is not the real power rating, that is peak! Buy a Kicker 12 inch c124 instead, once setup up right, you will be pleased with the bass performance:)

Below is a video showing the Kicker subwoofer in action!
Read More
Posted in | No comments

Can You Listen To Music While Playing a Game On PS3?

Posted on 10:57 by Unknown

If you want to listen to your music tracks that are stored on your ps3's hard drive, you are probably thinking if it is possible to listen to them when you are playing a game, at the same time. You have likely to attempt and tried to listen to music on your ps3 while playing a game on the ps3 and have found it won't allow you to do that. The reason why is because Sony for some reason have not allowed people to do it, however you can do that on a Microsoft Xbox 360 console, how odd is that? The ps3 should be able to play music while playing games because it has 8 high speed processors, making the ps3 have no problem, that is more CPU's than a Xbox has and the Xbox 360 console allows you to listen to music and play games. It just doesn't make any sense:(

My advice to you would be to always check regularly on the PlayStation 3 website, this is to see if there is a latest official software update because you never know, the new software update can allow ps3 owners to listen to their music and playing games at the same time, which everybody is waiting for.
Read More
Posted in | No comments

How Does The Maximum Bid Thing On Ebay Work?

Posted on 04:26 by Unknown
The maximum bid thing on Ebay allows people to bid there maximum price that they are willing to pay for an item. For example: If you see a computer screen for £20.00 and you want to pay £40.00 to secure that purchase, you can do that by typing £40.00 as your bid, that will be your maximum bid. If the bid for the computer screen goes under the £40.00 and a bidder has bid his maximum at £35.00, you will still be the highest bidder because you have placed a bid at £40.00. If somebody bids higher than £40.00 and take it to £43.89, then your maximum bid has been outbid and the bidding war starts again!
Read More
Posted in | No comments

How To Make PS3 Graphics look Better On a SDTV (Standard Defentition)

Posted on 03:10 by Unknown

If you have connected your ps3 console to a standard definition TV, the picture quality will look terrible, if you compare it with a HD telly. Most consoles can output the standard 480p, you know the standard dentition resolution for the old CRT TVs, but the ps3 graphics card can produce a whopping 580p on a SD TV! So you still will get decent picture quality on your normal television. If you think your ps3 can look better on your SD TV, below are some great tips to help your ps3 display graphics more better:

1)If you are using composite to connect your ps3 to your TV, you know the red, white and yellow RCA connections, you are not maximizing the Tv's full picture quality potential. The picture quality composite connections sucks, so buy a proper RGB scart cable because it will provide a cleaner looking picture and make it look more colorful and cleaner. 

2)Make sure the TV setting on your ps3 is set to 580p and if your TV is widescreen (16.9), then also set your ps3 to display it.

2)Use a gold plated cable to connect your ps3 to your TV, not silver. Gold is a better conductor delivering signal, if compared to a silver cable. So remove your silver cable and swap it for a gold plated one, trust me you will see a graphical change.

3)Tweak around with the contrast, brightness, colour, and sharpens settings on your television. Play around with each settings and find the optimal tweaking point, based on how you want the graphics to look on your TV. See the user manual for accurate guidance on how to make these adjustments.

4)Turn on your ps3 console, once the XBM  menu has loaded up, go to settings and the select 'Game settings'. Then enable the option called 'PS smoothing'. Once you have enabled this, the ps3 will automatically reduce the roughness of the graphics that are displayed on your TV, making them look smoother and more natural.
Read More
Posted in | No comments

Thursday, 11 August 2011

How To Replace The Battery Pack Inside a TomTom 720 (GUIDE)

Posted on 07:21 by Unknown

If your TomTom 720 sat nav doesn't turn on because the battery is not charging, or the battery life is very poor because the battery is not holding charge and it is fully charged up, it is likely the battery pack inside the sat nav is faulty. So you will need order a replacement battery pack and then remove the old one and fit the new replacement battery pack. To do that you will need a appropriate size t5 torx screwdriver, this is to unscrew the screws.

Once you have the replacement battery pack, a screwdriver and some spare time on your hands, watch the video tutorial below because it shows you how to open the TomTom 720 sat nav and replace the battery:

Read More
Posted in | No comments

Does Your Nintendo DS Lite Have The Hinge Broken or Cracked Problem?

Posted on 07:06 by Unknown

Many owners will take care of their Nintendo ds lite handheld gaming console and are puzzled why the hinge is cracked or completely broken into pieces. Well don't blame yourself, according to Nintendo, they claimed that there are a huge amount of people that own a ds lite that have the hinges cracking, then eventually the plastic will become weaker and break off. There were Nintendo ds lite consoles on the market that had manufacturing problems with the build quality of the hinges and that is likely the reason why the hinge is cracked or broken on your ds lite console.

If your console has had a hard time and has been handled rough, such as you dropping it by accident on a hard floor numerous times, that can also be the cause for the crack to appear on the hinge. The cracks starts to appear on the left and right hand sides, then after many times of you opening and closing the flip mechanism, the crack spreads and then the hinge completely breaks off the console.

If the hinge is cracked or broken on your Nintendo ds lite console, it is not a big problem. The reason why is because you can order a genuine hinge, replace it yourself and fix the damaged yourself. If you don't want to spend any money on repairing costs and the hinge is cracked, but not yet broken off, pour some super glue into the crack. This will prevent the crack from expanding and breaking off.
Read More
Posted in | No comments

Wednesday, 10 August 2011

How To Remove The Front Cover/Housing On a Nokia N95 8GB

Posted on 13:52 by Unknown
If you have had your mobile phone for ages, the condition of the phone will get worn out. Most people always scratch the front cover because there car keys were placed in the pocket were the Nokia n95 was kept. If something like this actually happens, the screen lens will get scratched, as well as the front cover. If you want to change the front cover that is on the Nokia n95 because you have purchased a brand new replacement, you will need to remove the old one first. To carry out the disassembly, you will require a torx 5 screwdriver, a spare sim card, a lint free cleaning cloth and at least 5 minutes of your time.

Instructions:

1)Slide up the mobile phone upwards, you will see two small torx 5 screws. Get your screwdriver and unscrew them both, once unscrewed place them in a safe place where they can't get lost.

2)Now slide the mobile phone downwards, you will see the music playback keys. Turn the phone over and you will see two more screws holding the top cover onto the slider. Unscrew these using your screwdriver and also keep them in a safe place.

3)Then run a sim card through the sides of the front housing, this is to unclip the clips that are holding it firmly in place. Don't use a flat head screwdriver to do this because that can cause marks to be left on the sides of the slider.

4)Once you have done that, remove the front cover gently using your hands, then remove the keypad, then remove the ear piece speaker, using your finger and place them to one side. Get a lint free cloth and wipe the main LCD screen clean, this is to remove any dust.

5)Once cleaned, you are ready to fit your new replacement front cover. So place the keypad inside the cover, also place the ear piece speaker inside cover and place it onto the phone. Then replace all 4 torx 5 screws and screw them in tightly, using your screwdriver.
Read More
Posted in | No comments

How To Charge Up a PS3 Controller With a PC or Laptop

Posted on 13:32 by Unknown


If you don't have your ps3 console available and you need to charge your dead ps3 controller, if you have a PC or laptop, you can charge the ps3 controller up. The ps3 controller requires voltage that is proved by the usb port on the ps3 console; this is to charge the battery up. Computers and laptops also can provide that via usb, so it is possible.

To charge up your ps3 controller using a PC or laptop, i have provided clear and accurate instructions to help you do so:

1)Turn on your computer or laptop.

2)Next, connect the usb cable into a spare usb port on your computer or laptop. On most PCs a spare usb port can be located on the back of the motherboard, or on the front of the tower. Laptops will have them placed on the sides or at the rear.

3)Once you have connected the usb cable to the computer or laptop, connect the other end of the cable into the top mini usb port on the ps3 controller.

4)If followed the instructions, the 4 lights on the ps3 controller will be flashing red, that shows the controller is charging up correctly. When the battery inside the ps3 controller is fully charged, the 4 lights will turn off automatically. When that happens, you can unplug the controller from the usb cable, then unplug it from the usb port on the computer or laptop and you can then turn off the computer or laptop.
Read More
Posted in | No comments

How To Reset PS3 Display Settings On a Slim Console

Posted on 10:59 by Unknown
 
 
If your ps3 slim console has the incorrect output display settings that are currently configured, the screen will display nothing, just a blank screen. This can happen because the display settings on the ps3 slim are not compatible with the resolution or the refresh rate of the television, projector or PC monitor. If you are facing this kind of problem with your ps3 slim, you will need to reset the display settings back to factory defaults. 

Sony has made it really easy for anybody to reset the display settings on a ps3 slim console. All you have to do is power on the console and hold the power button down for 5 seconds. Once you hear the second beep sound, which will indicate the reset has been completed. Once the ps3 has reset the video settings on the ps3 slim back to the standard 480p, you can then go into the menu and select the correct supported resolution for your TV, projector or PC monitor.
Read More
Posted in | No comments

How To Connect Your PS3 To a PC Monitor Screen Using VGA, Not DVI

Posted on 07:37 by Unknown

Do you need help on which cable you need to buy to make a working connection to display your ps3 on your PC monitor or projector?

If you want to hook up and connect your ps3 console to a PC monitor screen, that has no DVI support, without out HDCP and only has VGA, then you will require a special type of cable, it is the same situation with a projector. You will need a cable that will convert the digital picture signal into analog signal for the VGA on the PC monitor screen. Some good quality ps3 to VGA cables have them built in and some cables that are on the market require a separate converter box. The box that converts the digital signal into a analog signal can cost double of the amount of the price of the cable. So personally, would recommend you to buy the 'HDFury Gamer Edition cable' because it cheaper than buying a converter box and actually works! 

I have a spare PC monitor in my other spare room, so i bought that cable and it worked perfectly. It is the first working cable that i have tested that can actually provided a high definition signal over VGA. The cable can provide the full 1080p display resolution in games and blue-ray movies, only if HD resolutions are supported by your PC monitor or projector. The cable has gold plated connectors, which enhances the quality of the picture even further. So if you are want to get fully HD 1080p on your supported PC Monitor through VGA, the HDFury cable is the correct cable for you to buy and i have tested it and it works 100 % without any problems.
Read More
Posted in | No comments

How To Fix a Pushed/Pressed In Speaker Dust Cap Using a Hoover

Posted on 07:24 by Unknown

If the dust cap of a speaker has been pressed in, the dust cap will look ugly and will make the speaker not look at its best. However, if the dust cap of a speaker is pressed in by accident, it it will not effect the performance of the speaker itself. If the dust cap is cracked, that can cause dust to enter into the voice coil, which can cause it to stiffen up, that can reduce the driver's performance. Anyways, if you dislike your speaker because of the dust cap is pressed in, you can repair it using your household vacuum cleaner.

To unsuck the speaker dust cap, connect the vacuum cleaner to an electrical outlet and the switch it on. Then switch on the hoover and if possible, reduce the power of the hoovers suction power, as too much power can tear the dust cap and make the situation worse. Hold the hoover nozzle and then place it on the area were the dust cap is pressed in. Hopefully the area of the dust cap that is pressed in should be fixed. When it is fixed, turn off the power, this is to turn off the hoover. Don't pull the nozzle off the dust cap when the hoover is turned on because you're likely to tear the dust cap, so make sure you remember that!

If for some reason you don't have hoover that is available, if you have masking tape, you can use that to repair the pressed in dust cap. Don't use tape that is super strong, like 'Duct tape', as that will tear dust cap. Tear off a sensible amount of masking tape off the role, then place it on the area were the dust cap has been pushed in. Then slowly peel off the masking tape and the dented dust cap will be fixed!!
Read More
Posted in | No comments

Monday, 8 August 2011

How To Delete Your Data Off Your TomTom Car Sat Nav

Posted on 03:35 by Unknown

If you are selling or lending your TomTom car nav to a friend, you might want to keep your personal address and the recent destinations you have been, kept to yourself. Also if you TomTom car sat nav gets stolen by chance, they thieve can obtain your address, this is not good. Data such as stored postcodes and address don't get automatically erased off the TomTom's memory. If your erase your personal data you want to delete off the TomTom sat nav, it will also start up and shut down faster.

So to remove your data of the TomTom sat nav, all of them come with a reset feature, it is located underneath the TomTom were the usb mini cable socket is located. When you press the reset button in, the TomTom will be reset to factory settings, as well as erasing the data off its on board memory. The reset button is placed in a location, which makes it difficult to press it in with your finger. So you will need to find a pin or a needle, this is so you can push it in the little hole and press in the reset button.


Once you have pressed the reset button in, when you do, the screen will be displayed as blank. Then press it out, your TomTom will then be reset. When you reset the TomTom, the home address were you live sometimes will not get deleted. So you will need to do it manually, so go into 'Change preferences' then go to 'Change home location' and the finally select a different location.
Read More
Posted in | No comments

Sunday, 7 August 2011

How To Remove Frost From a Car Windshield

Posted on 02:47 by Unknown

If you have kept your car outside when the temperature was ice cold because of heavy snow yesterday and today you notice the windshield on the car is full of frost?

Well if you have a garage it would be ideal for you to park the car inside there because this can prevent frost occurring on the windows on your car, stop the engine and also door locks from freezing up. Never mind, anyways to remove the frost from your car windshield grab hold of some deicer. In the deicer, it contains special chemicals that react with the ice on the windshield and magically removes it.

Instructions on how to defrost your car's windshield using a deicer can:

1)Give the can a good shake.
2)Then spray it all over the car windshield, if you have a ice scraper, you can scrape it on the windshield, this is to remove the frost quickly.
3)Stop spraying until the frost has melted.

If you don't have a deicer, you can use hot water in bowl as a quick alternative.

Instructions on how to defrost your car's windshield using hot water in a bowl:

1)Fill your kettle up with warm water, then switch it on and allow the kettle to boil the water.

2)Once the kettle has boiled the water to a hot temperature, pour the water into a bowl or a similar container.

3)Gently take the bowl with you to the car, then pour it all over the windshield. If the other windows are frosty pour the water over them as well.

4)Take the bowl back to your kitchen.
Read More
Posted in | No comments
Newer Posts Older Posts Home
Subscribe to: Posts (Atom)

Popular Posts

  • How To Connect Two PS2 Consoles Together Using a iLink Cable/System Link
    The older fat style PlayStation 2 console has a iLink IEEE1394 port, which allows you to use a iLink cable to connect two similar PS2 consol...
  • How To Remove a Stuck Car Cigarette Lighter Thats Jammed In Socket
    A car cigarette lighter is used to light a cigarette. The cigarette lighter works by pushing the button in, when the metal elements found at...
  • How To Delete Game Saves Off a PS1 Memory Card
    A memory card can be inserted into a ps1 gaming console to save game progress you have made in games you play on the console. However, the p...
  • How To Open & Take Apart Sony PS2 Memory Card / PS2 Memory Card Disassembly
    The Sony PlayStation 2 console uses a memory card to store game save data you have created from playing games. Once the game save data has b...
  • How To Insert Micro SD Memory Card In Nokia 5233
    The Nokia 5233 supports a official maximum memory card size of up to 16 GB. The type of memory card that the phone supports is 'Micro SD...
  • How To Open PS2 Fat Disc Tray Without Power Manually
    The original version of the PS2 console uses a disc tray mechanism to load games into the disc drive, similar to how a DVD player works. The...
  • How To Fix a Broken PSP Wlan Switch Thats Not Working
    If the wlan switch is not turning on the Wi-Fi on the psp console, when switched in the on position, there is a problem. Most of the time ...
  • Does The Nokia 5233 Have a WiFi Connection Setting?
    So i just bought a Nokia 5233 and i have a wireless router, can i connect onto the internet using WiFi? Unfortunately, when Nokia manufactur...
  • How To Fix a Soldering Iron Tip Thats Not Melting Solder Wire
    A soldering iron is widely used in the electronics industry to melt soldering wire to create permanent solder joints onto printed circuit bo...
  • How To Fix PS2 Slimline Loud & Noisy Cooling Fan-Make it Super Quiet!
    So why does my PS2 slimline have a noisy fan? The reason why you hear the cooling fan inside your PS2 slimline spinning like crazy is becaus...

Blog Archive

  • ►  2013 (99)
    • ►  November (11)
    • ►  October (3)
    • ►  September (25)
    • ►  August (20)
    • ►  July (30)
    • ►  June (5)
    • ►  May (3)
    • ►  April (2)
  • ►  2012 (41)
    • ►  November (3)
    • ►  October (2)
    • ►  September (8)
    • ►  August (10)
    • ►  July (18)
  • ▼  2011 (366)
    • ►  December (1)
    • ►  October (64)
    • ►  September (65)
    • ▼  August (41)
      • Why Does My Nintendo Wii Disc Drive Light Flash Blue?
      • How To Connect a Bluray Remote To a PS3 Console
      • How To Fix Music Buttons That Are Not Wokring On a...
      • Can You Charge a TomTom Through USB On a Computer?
      • How To Charge a TomTom On The Computer, Using a Do...
      • How To Fix Your PlayStation 3 Thats Making a Hummi...
      • How To Fix a TomTom Sat Nav That Won't Turn On, Bu...
      • Is Your Nokia N95 Screen Damaged Because Of Water ...
      • How To Fix a Disc Stuck Inside Nintendo Wii Drive ...
      • How To Connect Any Mobile Phone Bluetooth Headset ...
      • How To Charge Your PS3 Conroller On a Xbox 360 Con...
      • How To Fix TomTom 720 Battery Not Holding Charge P...
      • How To Connect a Second Wireless Controller To a X...
      • Does Joikuspot Connect a PS3 To The Internet and PSN?
      • What is a CB Radio Power Microphone Exactly?
      • How To Hard Reset a Samsung E740 To Factory Settings
      • How To Tell If a BenQ or Lite On Drive Is Inside Y...
      • How To Remove a Disc Thats Stuck Inside The PS3 Sl...
      • How To Connect a Freeview Set Top Box To a TV
      • How To Spot a Fake Nokia 6288 Housing/Cover/Fascia
      • Do You Have To Tune a Sealed Subwoofer Enclosure?
      • Turn Your Nokia X6 Into a Decibel Meter To Measure DB
      • What IsThe Best Car Subwoofer That Hits Bass Hard ...
      • Can You Listen To Music While Playing a Game On PS3?
      • How Does The Maximum Bid Thing On Ebay Work?
      • How To Make PS3 Graphics look Better On a SDTV (St...
      • How To Replace The Battery Pack Inside a TomTom 72...
      • Does Your Nintendo DS Lite Have The Hinge Broken o...
      • How To Remove The Front Cover/Housing On a Nokia N...
      • How To Charge Up a PS3 Controller With a PC or Laptop
      • How To Reset PS3 Display Settings On a Slim Console
      • How To Connect Your PS3 To a PC Monitor Screen Usi...
      • How To Fix a Pushed/Pressed In Speaker Dust Cap Us...
      • How To Delete Your Data Off Your TomTom Car Sat Nav
      • How To Remove Frost From a Car Windshield
      • How To Lower The Tuning On a Ported Subwoofer Encl...
      • How To Turn Off Camera Flash Light On a Nokia X6
      • How To Fix NAT Router is Too Strict In GTA IV For PS3
      • Is It Free To Relist a Car On EBAY If Not Sold Or ...
      • How To Make PS3 WiFi Signal Stronger, Make Your Ow...
      • How To Use The Fan Test On a PS3 Slim To Clean It
    • ►  July (63)
    • ►  June (132)
Powered by Blogger.

About Me

Unknown
View my complete profile